How to Measure ROOM CO2 concentration with 20$ sensor "MH-Z19" and Raspberry Pi, 2nd edition.
MH-Z19 CO2 concentration Sensor
MH-Z19 is a small, low-cost, weigh 15g CO2 sensor module product by 郑州炜盛电子科技.You can buy it at an online shop like eBay
 or aliexpress about 20$.
The electrical interface of this sensor is compatible with Raspberry Pi. So you can make your D.I.Y. CO2 Monitor with MH-Z19, Raspberry Pi.

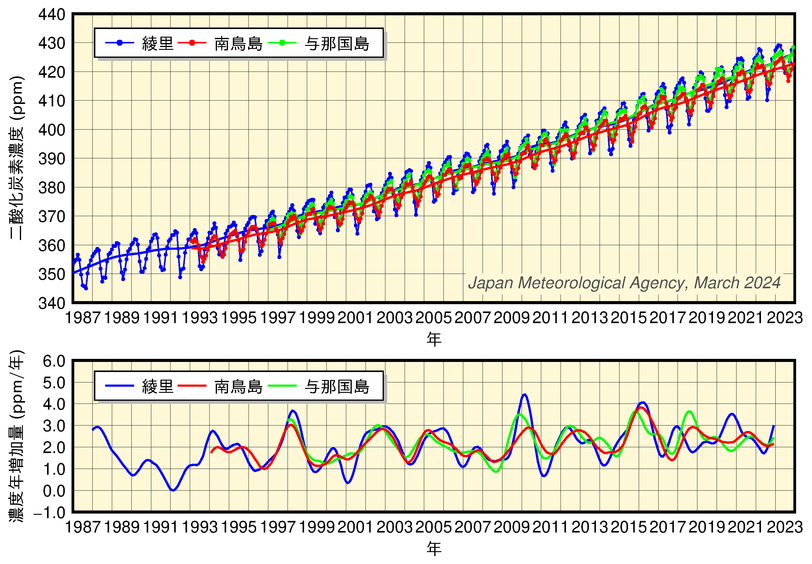
The normal CO2 concentration is about 400ppm. On a global scale, this value is sensitive to the effect of the activities of the plants, seasonally it gets lower in summer due to vigorous plants photosynthesis and getting higher in winter, and the long-range trend is continuing to rise linearly. The Japanese Meteorological Agency reports CO2 concentration chart continuously as hire. It indicates a clear trend of rising.
On your room-scale, in a closed room with 2 people, CO2 concentration rise up to 1,200ppm soon and keep falling slowly after 1 person go out.

In a high CO2 concentration room as 1200ppm, somebody can get a headache or sleepiness.
But no need to concern about it. It falls down rapidly to about 400ppm after just open the window.

So, let's open the window and get fresh air to refresh your head when CO2 concentration is getting higher.
Let's measure your room CO2 concentration yourself by the MH-Z19 sensor and Raspberry Pi.

Cabling
Connect RPi & mh-z19 as:
- 5V on RPi and Vin on mh-z19
- GND(0v) on RPi and GND on mh-z19
- TxD and RxD are connected to cross between RPi and mh-z18
Following is an example of cabling, you can free to use other 5v and 0v Pin on the RPi.
Install & Setup mh-z19 software
The software library to handle the MH-Z19 sensor on the Raspberry Pi is available as here.
You can download the latest release or git clone as:
git clone https://github.com/UedaTakeyuki/mh-z19.git
git clone https://github.com/UedaTakeyuki/mh-z19.gitThen, go into this directory and call setup.sh command as follows:
./setup.sh Read CO2 concentration value
Read MH-Z19 sensor value as follows:
pi@raspberrypi:~ $ sudo python -m mh_z19
{'co2': 668}Send sensor value to MONITOR™ to view Chart.
MONITOR™ is a free web service of a Still Picture based Remote Watching and Sensor data viewing like as following pictures.

Please refer to this introduction to grasp birds-eye understanding about MONIOR™.
A free account is available as follows.
A free account is available as follows.
Then, login and get a value_id which is a unique id to point a data area on the MONITOR™ to show the latest value and chart. Please refer to here for detail.
After getting a value_id at your browser, return to the terminal of your Raspberry Pi, then you should set your mh_z19 software to send measured value to send to the value_id. To do this, call setid.sh command in the mh_z19 installed directory. Let's say your value_id is vpgpargj, then issue setid.sh command as follows:
./setid.sh vpgpargj
Then, call "pondslider" python script as follows:
pi@raspberrypi:~/mh-z19 $ sudo python -m pondslider
{'co2': 742}
At the same time, your time-series chart on the MONITOR™ display should be updated by the latest CO2 concentration value.
In case the return value indicated as follows:
{"ok":false,"reason":"ViewID not valid"}Set automatically start to send CO2 data to MONITOR™ at the 5-minute interval at Raspberry Pi start up time.
You can set it by autostart.sh command in the mh_z19 installed directory as follows:
./autostart.sh --on
You can turn off this as follows:
./autostart.sh --off
Also, you can check the current status as follows:
./autostart.sh --status

Comments
Post a Comment